Thursday, December 12, 2013

Beading Tutorial: Easy Holly Berry Fringe

Christmas Holly Berry Fringe Project

One of my favorite things about beadwork is that way that you can easily use color or proportions to transform a stitch into something exciting and easily recognizable. My very first independent project was to create a necklace of ordinary leaf and branch fringe that looked just like a cluster of vineyard grapes. That was when I knew that I was truly and forever in love with beadweaving.

Today’s tutorial uses the same concept to create festive looks from simple techniques. The combination of daisy chain and leaf fringe provides an easy way to embellish holiday projects or dress up a Christmas necklace. You can start with a simple strand of seed beads or a beadwork base, such as a bracelet or necklace in your favorite rope stitch. Then all you need are size 11/o seed beads in bright red and dark green.

To Create Christmas Holly Fringe:

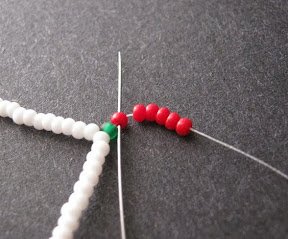
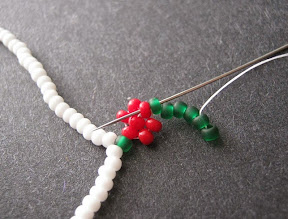
Attach a stop bead to a comfortable length of thread, and weave into your base, exiting from the point where you would like to begin adding berries. To start the simplest holly motif, pick up 1 green and 6 red beads, and slide them down to the work.

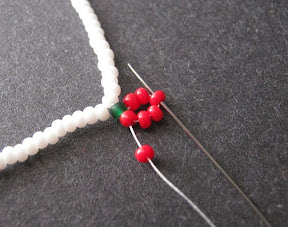
Stitch up through the first red bead added, and carefully pull snug to form the beginning of a daisy cluster, making sure that the beads are tight against the base. Pick up 1 red bead, and stitch through the fourth beaded added in the cluster, directly above the one your thread is exiting. Press the new bead into place at the center of the ‘berry’ and pull snug.


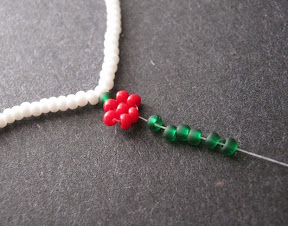
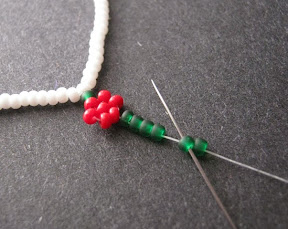
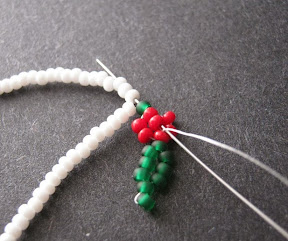
Pick up 6 green beads and slide them down to the work. Skipping the last bead added, pass down through the fifth bead and pull snug. Pick up 3 green beads, and stitch back through the first green added in the previous step, and the following red bead. Pull snug to form a leaf. Weave back through the first berry and into the base, exiting from the next start point.


Christmas Holly Berry Beading Tutorial


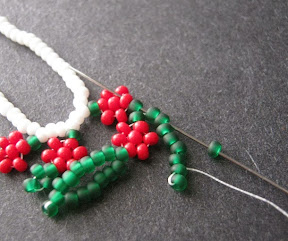
You can create different looks by changing up the pattern and proportions of your berries. Add a picot instead of a leaf by picking up just 4 green beads, and stitching back through the first one again. Nudge the beads into the picot shape and pull the thread snug before weaving back through the work.

Make larger leaves simply by picking up more green beads in the first step. Subtract this number by three to get enough beads to form the other half of the leaf in the second stitch.

Holly Berry with Picot Holly Berry Chain with Extended Leaf


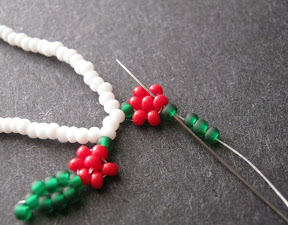
Create larger clusters of berries by adding them in a daisy chain, with 2 or more green beads in between for anchoring leaves to. You can extend these leaves away from the berries by adding 2 or more extra beads as a stem.

This combination of daisies and leaves works great for flower projects, naturally, as well as other inspirations. Try using yellow, orange, and green beads (with a contrasting leaf color) to make citrus trees!

Copyright 2013 Inspirational Beading
Subscribe to Inspirational Beading
Get inspired on Facebook and Google+


4 comments:

  1. Very nice. Easy to do but would make a lot of texture to a piece. Thanks for sharing
    Nicole/Beadwright

    ReplyDelete
  2. That is adorable for my little granddaughters!!

    ReplyDelete
  3. Love this. Thank you for sharing. Thought process churning now. :)

    ReplyDelete
  4. Un diseƱo muy sencillo pero espectacular. Lo pongo en mis trabajos pendientes. Muchas gracias por compartir. Un saludo

    ReplyDelete

Blog Widget by LinkWithin
Fire Mountain Gems and Beads

Inspiration Topics

accessories amulet Ancient Worlds Modern Beads animals April's Army art ArtFire astrology astronomy autumn awards awareness bangle beach Bead Inspired Bead Shops bead soup bead spotlight bead stash Bead Trays beaded beads beading theory beads belt bezel birthstones black blog spotlight blue boho bone book spotlight bracelet Bracelet A Week branch fringe brick stitch brown bugles buttons cabochon ceramic chain maille challenge charity chevron chain christmas collar Collections color Color Ideas color triads conservation craft shows crafts crochet crystals cuff Culled Beads current events Current Faves daggers Daily Sets daisy chain Delicas Destash drops Dutch spiral earrings Egypt Egyptian Gods embellishing embroidery environment etsy exotic fair trade fantasy fashion Favorite Beads Favorite Techniques feminine fibers film findings fire polish fixtures Flashback Test flickr inspiration flowers food found object free form fringe Geek Jewels geekery gemstones geography giveaway glass gold gray Greece green herringbone hex cuts history holiday home decor insects inspiration tip inspired beader Inspired by... Inspiring Links ivory Jewelry Stash knitting ladder stitch lampwork lariat leaf fringe leather lights literature loomwork macrame magatamas Master Class Medallions metal free metalwork Mini Collar a Week mixed media mixture Mood Board MOP multi-color multi-strand music natural beads nature necklace Necklace a Day Nepal chain netting New Beads ocean ombre orange paint paper patterns pearls pendant peyote photography Picasso finish pink Pinspiration PMC polymer clay poster sketch purple quick inspiration rainbow RAW red resin ring Ring a Day rivoli Rome Russian spiral scarf science seed beads shell silver soutache spiral rope spring square stitch St. Petersburg steampunk stringing stripes summer tagua TBT The Elements thread Tilas Time Capsule tools trade beads triangle weave tribal tropical turquoise tutorial two-hole beads Ugly vintage Wear it Twice weather white winter WIP wire wishlist wood World Beaders yellow
Blog Home * About * Beading Tutorials * Advertise

Learn About Sponsoring Inspirational Beading with Project Wonderful
Affiliated With ShareASale.com and Amazon.com